Improve End-to-End Testing for Salesforce Commerce Cloud using Playwright


Background
At Tevpro, we prioritize a robust level of unit testing to safeguard against unintended consequences when making changes to code. While comprehensive coverage is ideal, focusing on crucial components with thorough unit tests and complementing them with end-to-end (e2e) testing for broader coverage is often the most effective approach.
On a recent project, we needed significant website modifications and enhancements on a sizable e-commerce platform powered by Salesforce Commerce Cloud (SFCC) + Storefront Reference Architect (SFRA). Unfortunately, our application lacked extensive end-to-end (e2e) test coverage. The limited automated e2e tests that did exist were primarily utilized by the QA team and were not developer-friendly. They were integrated into our ALM workflow and primarily served reporting purposes for upper management. Determined to improve this scenario, we created a test suite using modern tooling like Playwright, empowering developers to engage in testing and seamlessly integrate it into our CI/CD pipelines for long-term efficiency.
Setting up the test suite
The rest of this tutorial assumes you have already created a Playwright project by following the installation documentation.
Our ultimate goal with this tutorial is to construct a test suite that operates with genuine data sourced directly from SFCC instead of mocked data. To achieve this, we must develop the necessary functionality to enable our test suite to connect to a running SFCC instance (a sandbox, development, or staging environment) and retrieve data essential for validating the application. Opting for the Open Commerce API (OCAPI) over the Salesforce Commerce API (SCAPI) was a deliberate choice. Our comprehensive test suite demands the ability to access custom preferences and toggle other features not currently supported by SCAPI.
Note: This won't cover the basics of setting up Playwright and writing your first end-to-end test, that is pretty well covered in the docs.
Steps
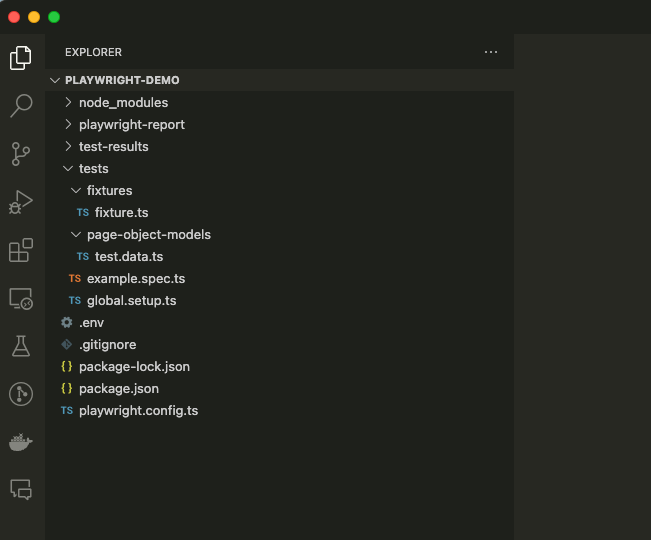
Create the following folder structure and blank files in your newly created Playwright repo.
- .env (What is a .env file?)
- global.setup.ts (What is a global setup file?)
- page-object-models/test.data.ts (What are page object models?)
- fixtures/fixture.ts (What are test fixtures?)
- playwright.config.ts
- example.spec.ts (This is where we will write our tests)
Important to note: you will also need OCAPI credentials and to configure your sandbox to allow any of the OCAPI endpoints you will be calling (OCAPI documentation)
After creating these folders and files, your repo should look similar to this:
Environment File
The .env file is where we will store the environment variables that our tests will use to connect to the proper SFCC environment for our test runs.
SFCC_HOST=abcd-001.dx.commercecloud.salesforce.com
BASE_URL=https://abcd-001.dx.commercecloud.salesforce.com/s/RefArch/

# OCAPI Config
OCAPI_SITE_ID=RefArch
OCAPI_CLIENT_ID=3ce09d60-9b6f-4814-8eca-6bf5a4369e20
OCAPI_CLIENT_SECRET=
OCAPI_INSTANCE_TYPE=sandbox
DW_AUTH_URL=https://account.demandware.com/dw/oauth2/access_tokenGlobal Setup
The global.setup.ts file is just a chunk of code that you can configure to run before any of your other tests. We use this to fetch an OCAPI auth token which we save as an environment variable called OCAPI_AUTH_TOKEN that we can use for subsequent OCAPI calls.
import { test as setup } from "@playwright/test";

setup("fetch OCAPI auth token", async ({ request }) => {
  const url = process.env.DW_AUTH_URL!;

  const auth = Buffer.from(
    `${process.env.OCAPI_CLIENT_ID}:${process.env.OCAPI_CLIENT_SECRET}`
  ).toString("base64");

  // Send auth request to SFCC to get auth token
  const response = await request.post(url, {
    headers: {
      Authorization: `Basic ${auth}`,
      "Content-Type": "application/x-www-form-urlencoded",
    },
    form: {
      grant_type: "client_credentials",
    },
    ignoreHTTPSErrors: true,
  });

  const token = await response.json();

  process.env.OCAPI_AUTH_TOKEN = token.access_token;
});
Test Data
The test.data.ts file is where all of our logic related to fetching and storing the test data from SFCC will be contained. This class can be injected into any of our tests and will be used to help validate different test scenarios.
Few things to note here:
- fetchData - This function is used by all our other functions to ensure we pass our bearer token along with each request.
- fetchProducts - This function is used to fetch a comma-separated list of products all at once vs having to fetch them individually.
- init - This function is used in our fixture.ts file to bootstrap any API calls we want to make. In our example, we are only fetching a few products, but in reality, you might need to fetch products, promotions, content assets, etc., used by all your different tests.
import { APIRequestContext } from "@playwright/test";

export class TestData {
  readonly request: APIRequestContext;

  products: any;

  constructor(request: APIRequestContext) {
    this.request = request;
  }

  async init() {
    try {
      await Promise.all([
        this.fetchProducts("product1,product2,product3"),
      ]);

      return this;
    } catch (error) {
      throw error;
    }
  }

  private async fetchData(url: string, body?: any) {
    const requestOptions = {
      headers: {
        Authorization: `Bearer ${process.env.OCAPI_AUTH_TOKEN}`,
      },
      ignoreHTTPSErrors: true,
      data: body,
    };

    const response = await this.request.get(url, requestOptions);
    return response.json();
  }

  async fetchProducts(productIdList: string) {
    try {
      const url = `https://${process.env.SFCC_HOST}/s/${process.env.OCAPI_SITE_ID}/dw/shop/v24_1/products/(${productIdList})`;
      const params = new URLSearchParams({
        client_id: process.env.OCAPI_CLIENT_ID!,
        expand: "promotions,prices,options,variations,bundled_products",
      });

      const productsUrl = `${url}?${params.toString()}`;

      const products = await this.fetchData(productsUrl);

      return products.data;
    } catch (error) {
      throw error;
    }
  }
}
Fixture
The fixture.ts file is where we piece all of this together. You can see here we create a TestOptions type and include a new property called testData which uses our TestData class created in the test.data.ts file.
Few things to note here:
- We must instantiate our TestData class and pass it our request object.
- We need to call the init() function, which will fire off any OCAPI requests to populate our class with the list of products.
import { test as base } from "@playwright/test";
import { TestData } from "../page-object-models/test.data";

// Declare the types of your fixtures.
export type TestOptions = {
  testData: TestData;
};

// This new "test" can be used in multiple test files, and each of them will get the fixtures.
export const test = base.extend<TestOptions>({
  testData: [
    async ({ request }, use) => {
      const testData = new TestData(request);
      const test = await testData.init();
      await use(test);
    },
    { auto: true },
  ],
});

export { expect } from "@playwright/test";
Playwright Config
Next up, we need to make a slight modification to our playwright.config.ts file.
Few things to note here:
- Uncomment the require('dotenv').config() section and ensure you install dotenv as a dev dependency.
- Update the baseURL to use our environment variable.
- Add a new object to the projects array that includes our global.setup.ts file.
- Update the chromium object and add the dependencies array (this will ensure that each time we launch our tests, the setup step will run before it).
import { defineConfig, devices } from '@playwright/test';

/**
 * Read environment variables from file.
 * https://github.com/motdotla/dotenv
 */
require('dotenv').config();

/**
 * See https://playwright.dev/docs/test-configuration.
 */
export default defineConfig({
  testDir: './tests',
  /* Run tests in files in parallel */
  fullyParallel: true,
  /* Fail the build on CI if you accidentally left test.only in the source code. */
  forbidOnly: !!process.env.CI,
  /* Retry on CI only */
  retries: process.env.CI ? 2 : 0,
  /* Opt out of parallel tests on CI. */
  workers: process.env.CI ? 1 : undefined,
  /* Reporter to use. See https://playwright.dev/docs/test-reporters */
  reporter: 'html',
  /* Shared settings for all the projects below. See https://playwright.dev/docs/api/class-testoptions. */
  use: {
    /* Base URL to use in actions like `await page.goto('/')`. */
    baseURL: process.env.BASE_URL,

    /* Collect trace when retrying the failed test. See https://playwright.dev/docs/trace-viewer */
    trace: 'on-first-retry',
  },

  /* Configure projects for major browsers */
  projects: [
    {
      name: "setup",
      testMatch: /global\.setup\.ts/,
    },
    {
      name: 'chromium',
      use: { ...devices['Desktop Chrome'] },
      dependencies: ["setup"],
    },
  ],
});
Example Test
All that is left to do is write an end-to-end test and utilize our test data. We will do this in our example.spec.ts file. All we are doing here is looping over the list of products that we fetched and validating that they exist on the page.
A real-world example might be if you wanted to validate that all product tiles on your product listing page existed and had the correct pricing.
Few things to note:
- We inject our testData class into our test, which contains all the products we fetched.
- You could also inject this into a beforeEach if you wanted to use this across all tests in a single spec file.
import { test, expect } from "../tests/fixtures/fixture";

test.describe(`Product Details Page Tests`, () => {
  test("has products on page", async ({ page, testData, baseURL }) => {
    await page.goto(`${baseURL}/product-list`);

    for (const product of testData.products) {
      const element = await page.getByText(product.productName);

      // Ensure element is visible
      await expect(element).toBeVisible();
    }
  });
});
Conclusion
This is a simple example, but in practice, you could build a full test suite that covers all the different scenarios or your particular storefront.
We hope this article has helped you successfully configure a Playwright project to fetch products from an SFCC instance via OCAPI. You could certainly use the same approach to fetch data from SCAPI or any API, for that matter.
If you still have questions or want to learn more about Tevpro's consulting services, reach us via Twitter , Linkedin, or send us a message.
Photo by Mike Petrucci on Unsplash


Angular • React • Ionic • NestJS • C# • Azure • Next.js